about

Two ladies who love food.

Sunday, January 25, 2015

Kale Chips 101


I will never forget my first encounter with kale chips. I had just flown a redeye from Abbotsford, BC to Toronto, ON, and as I stumbled through the airport at four in the morning on my layover, I couldn't help but notice that every store was selling the same thing: kale chips. Kale chips everywhere. This was my first impression of Eastern Canada. After a quick google search, I realized how easy they are to make from scratch and I haven't looked back.

There are two things to keep in mind when making your own kale chips: you must ensure the kale is dry before adding the oil, otherwise they will not be as crispy. And unfortunately, homemade kale chips don't have too long of a shelf life. I would recommend eating these they same day they are made. However, they are addictive enough that the lacklustre shelf life shouldn't be an issue.

The beauty of making your own snack food is that you can customize it exactly how you want it. In this case, I used my boyfriend's favourite seasoning: it's made by an oil company but seems to be a seasoning salt with cumin and cayenne pepper added. I've made them previously with regular seasoning salt and garlic salt for similarly delicious results. I've heard that Parmesan cheese is also a good topping, but I haven't gotten around to trying that yet. This is a pretty open recipe - don't be afraid to tailor it to your tastes.


Kale Chips

Author: Amanda
Difficulty: easy
Makes 1 batch (enough for two people)


Ingredients
  • 1 bunch kale
  • 1-2 tablespoons olive oil
  • seasoning of choice

Directions

Wash the kale well and cut or rip into slightly-larger-than-bite-size pieces and discard the woody stems. Dry thoroughly with a clean kitchen towel. In a medium sized mixing bowl, massage 1-2 tablespoons of olive oil into the kale with your hands, ensuring that all of the leaves are evenly coated. Add the seasoning to taste, and mix again. Lay out on baking sheets so that the chips are not touching and bake at 300F for 15-20 minutes, until leaves are crispy and not wilted. Remove from pan and serve immediately.

Step-by-Step Photos


Wash the kale well and tear into pieces that are a little bigger than bite-sized. They will shrink in the oven as they roast. I like to line my mixing bowl with a clean kitchen towel and put the kale directly into the towel so I can dry it off thoroughly.


Fold the towel up and work it into the bowl to dry off the kale leaves. Kale is pretty tough, so you shouldn't have to worry about tearing your chips even if you are a little vigorous.


Once the kale leaves are dry, remove the towel and drizzle in 1-2 tablespoons of olive oil to taste (and depending on the size of your particular batch of kale). Use both hands to "knead" the oil into the kale - this helps to ensure the leaves are evenly coated which results in a more uniform chip. Add the seasoning, but use less than you you think you need. The chips will shrink down as they roast, concentrating the seasoning a little. Mix up the leaves again to ensure an even distribution of seasoning. At this point you can cover up the chips and store in the fridge to use the next day if desired - there is no discernible difference in kale chip quality.


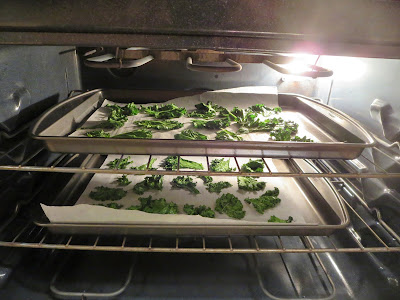
Preheat the oven to 300F, line a couple of baking sheets with parchment paper, and lay out the chips in an orderly fashion. My bunch of kale made enough for 4 pans of chips.


Roast at 300F for 15-20 minutes, or until the chips are crispy and not wilted.


The chips should slide off the parchment paper with ease and are ready for immediate, guilt-free snacking.

Wednesday, January 21, 2015

Turkey Quinoa Salad


Turkey and cranberry sauce are two of my favourite things, especially in winter months. When my mom would roast a turkey, she would always freeze the leftovers so we could have turkey through the rest of the winter, rather than eating it continuously and possibly suffering from turkey burn-out. In my family, it wasn't cranberry sauce unless it still had the indentations from the can it came out of, so I was pretty blown away the first time I tried making cranberry sauce on my own - what a difference! This year I made a batch of Spiced Red Wine Cranberry Sauce from Serious Eats, and split it up into smaller portions to freeze so I could pull it out as needed.

This quinoa salad takes a lot of its flavour from the Spiced Cranberry Sauce, but if making a recipe before making another recipe doesn't work for you, you can probably get away with using your ordinary canned cranberry sauce with a dash of nutmeg, cinnamon, allspice, and maple syrup or brown sugar. It won't quite be the same of course, but you will still have the essence of the dish. I also ended up using only half of the dressing in the salad - if you can't see yourself utilizing the leftovers then make a half batch of the dressing (it's really good on just about anything though).

I had originally planned to use feta in the salad, but after I started making it I realized I didn't have any more feta in the fridge. The cheddar is still great, but feta would be amazing, in my humble opinion. Feel free to substitute accordingly.


Turkey Quinoa Salad

Author: Amanda
Difficulty: easy
Serves: 4

Ingredients

Salad
  • 2 cups cooked turkey, cubed
  • 1 cup dry quinoa
  • 2 cups turkey or chicken stock
  • 1/2 cup toasted walnuts
  • 1/3 cup white cheddar in very small cubes (or crumbled feta!)
  • 1/2 bunch fresh spinach, chopped with stems removed

Cranberry Dressing

Directions

Add quinoa and stock to a small pot and bring to a covered simmer for 10-12 minutes, then turn off the burner and allow the residual heat to continue cooking the quinoa for an additional 4-7 minutes until desired firmness is acquired. Allow the quinoa to cool, and combine with the turkey, walnuts, white cheddar or feta, and spinach. In a small mason jar combine dressing ingredients and shake well. Pour half of the dressing onto the quinoa mixture and stir well. Serve.


Step-by-Step Photos


Any time I have tried to roast a whole bird, it goes terribly. And given that I'm not a huge fan of white meat anyways, I went and bought a couple of turkey thighs and it was the best idea. I rubbed these down with some olive oil and sprinkled with salt, pepper, and dried sage and baked at 375F for about an hour. One thigh gave me my two cups of turkey for the salad, and after deboning the meat, I made stock with the leftovers - it was enough for the recipe and I had enough left in the freezer for a future meal! But if you already have turkey leftovers or are crunched for time, prepared chicken stock is more than acceptable to use as well.


Bring the quinoa and stock to a covered simmer for 10-12 minutes, then allow the residual heat to finish cooking it. Once it's done, fluff it with a fork and set aside to cool.


If needed, toast the walnuts in a small pan on low heat for about 10 minutes, stirring occasionally until fragrant. Remove from heat and allow to cool.


Combine the turkey, spinach, walnuts, and white cheddar in a large bowl with the quinoa.


Combine the cranberry sauce, apple cider vinegar, olive oil, salt, and pepper in a mason jar. Shake well to combine. (Doesn't it turn a pretty colour!?)


Add the dressing, and stir well to combine.


Serve and enjoy! This salad will keep in the fridge for at least a couple days - if it lasts that long!

Wednesday, January 14, 2015

Pomegrante Chicken Curry Salad


Oh man. I devoured this salad, and it might just be my new favourite way to eat pomegranates (short of just stuffing them in my face, of course). This recipe came about when I had some leftover curry mayo and roasted chicken to use up. I'm not the biggest meat eater, but when I do eat it I prefer to have it incorporated into a dish, rather than have it be the feature. And when I usually make chicken salad, I tend to migrate towards the recipes that have fruit in there (usually grapes). I didn't have any grapes in the house, but I had dried cranberries...and one lonely pomegranate. Luckily for me, it turned out to be the best idea.

I ended up folding this chicken salad into a wrap with a healthy dose of mixed greens. The avocado adds a lot of richness and the curry flavour is potent enough that I found I didn't need more than a couple tablespoons for a satisfying meal. If you wanted to throw in a stalk or two of finely chopped celery, I can see adding some wonderful crunch! This salad would also be great served with crackers or on field greens for a lower-carb option.


Pomegranate Chicken Curry Salad

Author: Amanda
Difficulty: easy
Serves: 3-4

Ingredients

Salad
  • 1 chicken breast, cooked
  • 1/2 cup fresh pomegranate seeds
  • 1 avocado
  • 1/2 bunch green onions
  • 1 jalapeno pepper, deseeded
  • 1 batch curry mayo (recipe follows)
  • pepper, to taste
  • 1/4 cup chopped walnuts (optional)

Curry Mayo
  • 1/4 cup mayonnaise
  • 1/2 teaspoon curry powder
  • 1/8 teaspoon cumin
  • 1/4 teaspoon salt
  • dash cayenne pepper

Directions

Combine curry mayo ingredients together and set aside. Section pomegranate in a bowl of water and remove the seeds. Set one half cup of seeds aside for recipe. Dice chicken breast into 1/2 inch sized pieces. Dice avocado, deseeded jalapeno pepper into small pieces. Slice green onion into small pieces. Add chopped walnuts if desired. Combine all ingredients in mixing bowl with curry mayo, and serve.

Step-by-Step Photos


The easiest way to deseed a pomegranate is to cut a portion off - aim for about 1/3 of the fruit or so, and submerge it in water. That way when you go to peel off the seeds from the flesh they should pop off fairly easily and won't burst and turn your kitchen into a murder scene. Extra white bits should float to the top so they are easy to discard. Put 1/2 cup aside for the salad and go to town on the rest while you prepare everything else.


Dice the chicken, avocado, and jalapeno pepper. Slice the green onions. Throw them all in a bowl with the pomegranate seeds. If you are using walnuts, throw them in too. I didn't think of them until after I had made the salad and once I put them in I knew it was a good decision.


Mix up all the ingredients with some curry mayo and pepper. I had the curry mayo from a couple of days before, so I don't have pictures of it, unfortunately. Now it is ready to serve!


I had my wrap with some hummus and cucumber sticks and a dry vanilla soda. I can't wait to make this again before pomegranates go out of season!

Sunday, January 4, 2015

Bacon Pineapple Fried Rice


I am a sucker for fried rice. When I was first living on my own and trying to get the hang of feeding myself on a regular basis, fried rice was a staple. It's a great way to use up odds and ends in the fridge, so the possibilities are endless! Over the years I have learned little things here and there that have really brought up my fried rice game.

Want to know the biggest secret?

Day old rice.

Yep. That's the biggest bit right there. Fresh rice is delicious, but it won't fry. It'll steam, sure, but is that really what you want? No. You want the chewy, almost-greasy-but-not-quite fried rice that will welcome you without judgement and with open arms. So, for the best results, either use leftover rice from another meal or make it the day before and leave it in the fridge overnight. If you're really pressed for time or forgot to think ahead, make fresh rice and spread it out on a cookie sheet to let it cool quickly for an hour or two. That will also give you similar results.

This fried rice utilizes the bacon fat to fry the rice in, which in my humble opinion is the way to go. It saturates the rice in bacon flavour, so you can stretch out that package of bacon for another meal. With the rising price of pork, I think that's a splendid idea.


Bacon Pineapple Fried Rice

Author: Amanda
Difficulty: easy
Serves: 4-6

Ingredients
  • 6 cups day-old white rice
  • 1/2 package bacon
  • 2 eggs
  • 1 white onion
  • 1/4 fresh pineapple, cored
  • 1 red bell pepper
  • 3-4 tablespoons soy sauce
  • 1/2 bunch cilantro (optional)

Directions
Slice bacon and fry in wok until crispy. Dice onion, bell pepper, and pineapple. Wash and finely chop cilantro. Remove bacon from wok, set aside, and drain fat, reserving 1-2 tablespoons of fat in wok. Scramble eggs in wok, and set aside. Use the spatula to break up eggs into small pieces. Wash wok if necessary, and return approximately 3 tablespoons of fat into wok. Saute onion in bacon fat on medium-high heat until translucent, 3-4 minutes. Add rice, and fry for 7-10 minutes, flipping rice mixture frequently with spatula. Rice should "pop" while frying. Add bacon, pineapple, and bell pepper to mixture and continue to fry an additional 5 minutes. Add soy sauce to taste, and fry an additional 2 minutes to allow moisture to evaporate. Remove from heat, and add eggs and cilantro. Stir to combine, and serve.

Step-by-Step Photos


Make your rice the day before, and store in an airtight container in the fridge.


I used half a 500g package of bacon. Slice it up ahead of time so that it will crisp up evenly. I find that easier than trying to cut up crisped bacon, anyhow.


Go ahead and crisp that bacon up in the wok. Once it's nice and crispy, turn off the heat and remove the bacon and set aside. Drain the bacon fat, but reserve it for later. Keep 1-2 tablespoons in the bottom of the wok for the eggs.


Scramble the eggs and fry them in the bacon fat on medium-low heat. Once they're sufficiently done, remove them from the wok and set aside. If there's some egg left in the wok like mine here, it's a smart idea to wash it out quickly before continuing.


At some point, maybe while frying the bacon or eggs, dice up an onion.


Start frying that onion in about 3 tablespoons of the bacon fat.


While the onion is frying, capitalize on that time and prepare the bell pepper and fresh pineapple.


Once the onion is translucent, add the rice and crank up the heat to medium-high. This is where you have to exercise some patience. Frying rice does take a little bit of time, but if you want that signature fried rice texture, there's no way around it. Flip the rice mixture around frequently so that all of the rice gets a chance to get to the bottom of the wok, where the heat is the most intense. After a few minutes, you should start to hear the rice crackle and make "popping" sounds. This is exactly what you are looking for. Keep going.


After 7-10 minutes, this is what the fried rice should look like.


Now you can throw those add-ons in, and keep up that frying technique for another 5 minutes or so.

Add the soy sauce to taste. I usually add a little bit, stir it in, and taste to see if it's enough. That way you won't accidentally over salt all of your hard work. Keep the heat on to allow extra moisture to evaporate. I mean, after working this hard for that delicious texture, the last thing you want to do is make soggy rice, right? Right.


If you have a spare minute while frying, wash up a half bunch of cilantro, discard the stems, and finely chop it.


Finally, turn off the heat, and return the eggs to the pan. Add the cilantro...


...and stir well to combine.


Serve.